
Windows 7 updates sometimes appear to be moving at a snail’s pace, giving the impression that they’re stuck. But fear not, there are ways to tackle this issue. Many users opt for the Windows Update Standalone Installer to manage their system updates. Though not entirely offline, it’s a dependable method to enhance your system.
It appears that some users are encountering issues with Windows 7, particularly when it gets stuck while checking for updates. However, fret not! We have solutions to resolve the problem of Windows 7 endlessly checking for updates. Let’s dive into these fixes to get your system back on track.
What Are The Cause of Windows 7 Stuck on Checking for Updates?
Windows updates often drag on due to various reasons. Typically, these delays stem from software conflicts or undisclosed pre-existing issues that only surface once the updates are underway. While it’s less frequent, there are instances where Microsoft’s errors in the updates themselves can be the culprit behind the delays.
Methods to Fix Windows 7 Stuck on Checking for Updates
Ensuring your PC runs smoothly and stays secure requires regular OS updates. Yet, installing these updates isn’t always a walk in the park. Some users encounter a snag where Windows updates get stuck. Here are a few methods to tackle the issue of Windows 7 updates that never seem to finish.
Restart Your Device
Try restarting your computer using either the reset button or the power button. This often resolves the issue of Windows 7 updates that never seem to finish when Windows starts up normally. However, if the installation of Windows updates is frozen, a hard reboot becomes your sole option.
Once the computer restarts, you’ll likely encounter the Advanced Boot Options or Startup Settings menu. If not, select Safe Mode from there manually.
Safe Mode loads only the essential drivers and services needed by Windows, eliminating potential conflicts with other programs or services that might hinder the installation of Windows updates.
If the updates have been successfully installed and you find yourself in Safe Mode, you can then restart Windows normally to proceed.
Disable The Antivirus
The primary cause behind failed Windows updates often involves viruses or spyware interrupting the installation process. These malicious software entities tend to be targeted by Windows security upgrades, leading to their attempts to block your PC from receiving necessary patches.
Your antivirus software, a crucial element for any computer, can conduct a thorough virus scan on your behalf. Employing an on-demand scanner, like Microsoft’s offering, can assist in identifying potential compromises in your antivirus software.
Use The Troubleshooter For Update
In certain cases, a stuck update can find a resolution through Windows’ built-in troubleshooter. This tool enables you to:
- Halt the Windows Update service.
- Rename the C:\Windows\SoftwareDistribution folder to C:\Windows\SoftwareDistribution.old, thereby clearing the Windows Update download cache and allowing the process to restart.
- Restart Microsoft Update Services.
This troubleshooter is compatible with Windows 7, 8, and 10 and can be found in the same location across all versions of Windows.
Here are the steps to access it:
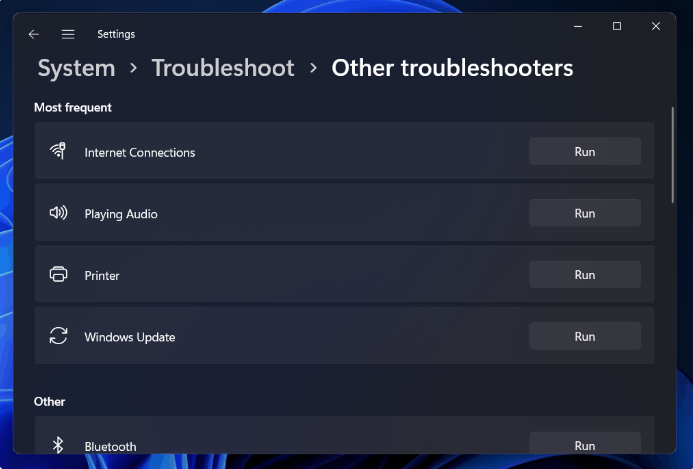
- Click on Start, then search for “troubleshooting,” and select the option.
- Navigate to the System and Security section within the Control Panel and click “Fix problems with Windows Update.”
- Within the Windows Update troubleshooting window, click “Advanced.”
- Ensure the “Apply repairs automatically” checkbox is selected in the advanced options, then click “Run as administrator” to allow the program to delete download cache files.
- Once the troubleshooter completes its task, it will notify you if it detected and resolved any issues. Typically, the troubleshooter effectively addresses the problem of Windows 7 updates that never seem to finish.
Relaunch The Windows Update Service
To set up Windows 7 anew involves a thorough scan through Windows Update for updates, a process that can span up to an hour. Even if your Windows 7 system has been in use for a while, it’s possible you haven’t checked for updates recently.
Recently, Microsoft issued official guidance on resolving this issue. Their recommendation involves installing the latest Windows Update updates to minimize problems like the ongoing issue of Windows 7 updates that never seem to finish.
Here’s a step-by-step guide:
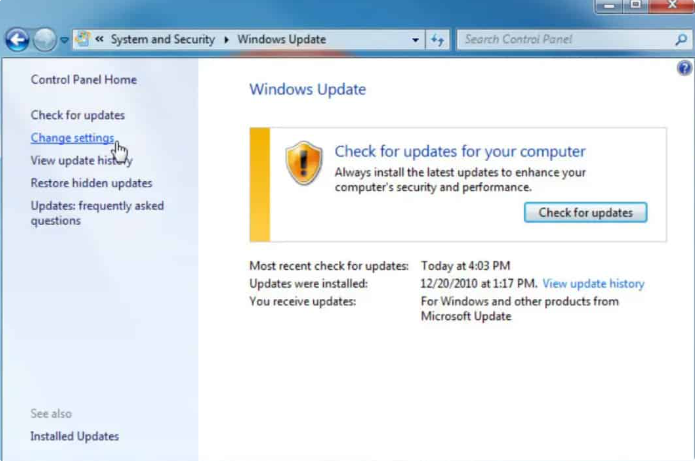
- Open Windows Update by navigating to Control Panel > System and Security > Windows Update.
- From the sidebar, select “Change Settings.”
- Choose “Never Check For Updates (Not Recommended)” from the selection box, then click OK.
- Restart your computer after making this adjustment.
Following the restart, it’s essential to manually download and install two specific Windows 7 updates. To do this, you’ll need to ascertain whether your system runs on a 32-bit or 64-bit version of Windows to download the appropriate updates.
Update Components Should Be Reset
To employ this technique, you’ll need to restart BITS, Cryptographic, MSI Installer, and Windows Update Services, as well as rename the SoftwareDistribution and Catroot2 directories.
Press the Windows key + X, then select Command Prompt (Admin). Enter the following commands sequentially:
Changing DNS Server Configuration
You can also address the Windows Update issue by adjusting the DNS server settings. Here’s how to update them:
- Press the Windows key + R to open the Run box, type ncpa.cpl, and hit Enter.
- Right-click the connection you wish to modify and select Properties.
- Navigate to the Networking tab if it’s not already selected.
- Choose TCP/IP Version 4 or IP Version 6 (TCP/IPv6).
- Click Properties.
- Access the Advanced menu and click on DNS.
- Locate the DNS server address entry. If needed for future reference, note down the existing values.
- Click Delete to remove the previous DNS entry, then select Add to introduce a new one.
- Enter the DNS value: For IPv4, use 8.8.8.8 or 8.8.4.4. For IPv6, use 2001:4860:4860:8844 or 2001:4860:4860:8844. Click Add and then OK.
- To check if the problem of Windows 7 updates that never finish is resolved, search for Windows updates. If the issue persists, reverting to the old DNS settings is straightforward. Simply repeat the steps above, entering the previous DNS values.
Install The Microsoft Official Patch
Microsoft has rolled out official fixes for earlier Windows versions, aiming to tackle this issue. It’s crucial to ensure these updates are installed, as they should effectively resolve the problem.
Here’s what you can do:
- Begin by downloading and installing Windows 7 Service Pack 1 and Windows Server 2008 R2. This step enhances your computer’s reliability during the initial update installation.
- Check for virtualization on high-end systems by right-clicking on the machine in Windows and selecting properties. If SP1 is listed under the Windows edition, it’s already installed.
- Download the file and execute it.
- After installation, restart your computer to ensure the changes take effect.
Final Words
Here’s the straightforward method to resolve the persistent issue of Windows 7 updates that never seem to finish. We trust you find this solution useful. If you need further information, feel free to comment below, and our team will gladly assist you.